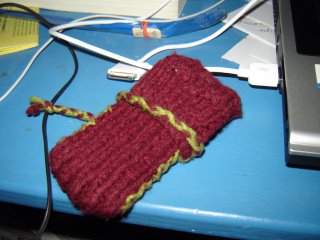
nano cozy

This one I made a while ago, but I've gotten enough comments on it I thought I should put it up so people can see how it's made. It's mostly straightforward, but there's a couple of tricks in it, too.
I used medium weight acrylic yarn and size 4 needles (slightly small for the yarn). Gauge: 1"=7 stitches vertically, and 5 stitches horizontally with a 1x1 rib stitch. Does anyone actually pay attention to gauge? Well, other than Sarra, that is. Anyhow, with this pattern it's better to be more snug than loose, as the rib stitch will stretch over the nano, so if you have really loose tension (mine's average to snug), you might want to take it down to 10 stitches across, and only cast off three at the important point.
CO 12 stitches
row 1-56: 1X1 rib stitch (k1p1), except slip over the final stitch
This part is to accommodate the jack in the corner of the nano. You may be tempted to knit on either side of the hole you are creating, but this is folly. It's a lot harder to get the iPod out that way--my prototype looked like that, and it was silly.
row 1 (57): cast off the first stitch, rib stitch to the end of the row, slip last stitch overAt this point, you can do one of two things: just do 18 rows of rib stitch, or make a pattern. The pattern is up to you entirely, of course, but this is what I did:
row 2 (58): rib stitch, cast off final stitch
row 3 (59): repeat row 1 (57)
row 4 (60): repeat row 2 (58); you should have 8 stitches across at this point.
row 5 (61): Cast on one stitch, rib stitch to end of row, slip last stitch over
row 6 (62): rib stitch to end of row, cast on one stitch at end
row 7 (63): repeat row 5 (61)
row 8 (64): repeat row 6 (62); you should have 12 stitch again
row 1 (65): p1k1, p8, k1, slip stitchNow, you've got a long thing-a-mee. Fold the ribbed area in half so that the raised cross pattern is on the outside. I secured the sides by binding it with a contrasting yarn. It can also be crocheted, if you are so inclined.
row 2 (66): k1p1, k8, p1, slip stitch
row 3 (67): repeat row 1 (65)
row 4 (68): repeat row 2 (66)
row 5 (69): repeat row 1 (65)
row 6 (70): repeat row 2 (66)
row 7 (71): p1k1, p3, k2, p3, k1 slip stitch
row 8 (72): k1p1, k3, p2, k3, p1 slip stitch
row 9 (73): p1k1, p1, k2, p2, k2, p1k1 slip stitch
row 10 (74): k1p1, k1, p2, k2, p2, k1p1 slip stitch
row 11 (75): repeat row 7 (71)
row 12 (76): repeat row 8 (72)
row 13 (77): repeat row 1 (65)
row 14 (78): repeat row 2 (66)
row 15 (79): repeat row 1 (65)
row 16 (80): rib stitch, slip last stitch
row 17 (81): repeat row 17 (81)
row 18 (82): repeat row 17 (81)
cast off, leaving a long tail
(the pattern is a small, raised cross)
To fasten the flap, I braided the tail with a long piece of the same contrasting yarn. Of course, you can use velcro or put a button on, but I found the long braid is actually the most practical, because it holds it shut but doesn't force it. In addition, you don't have to worry about the velcro getting at the screen.
**this is specifically for a nano--the fastenings as well as the size would have the be different on a full-size iPod, as it would be for a shuffle (you'll have to get at Sadie for one of those)


2 Comments:
Golly. I really shouldn't be a contributor to this blog ... I simply don't know enough.
LOL.
Post a Comment
<< Home